Introduction
Tonight we’re going to be looking into how sound is produced and also run through the steps required to get our Arduino to produce sound. The Arduinocan produce sounds a number of ways; The simplest method, and the one we’re going to look into is the tone() function.
Understanding how a speaker works
Sound is transmitted through the air as a pressure wave. As an object such as a speaker, drum, or a bell vibrates, that object also vibrates the air around it. As the air particles vibrate, they transfer energy to the particles around them, vibrating these particles as well. This chain reaction creates a pressure wave that is transferred from the sound source to your eardrum.
When we create a sound with our Arduino we can control two properties of these vibrating particles; Frequency and Amplitude.
Frequency- represents how quickly the air particles vibrate back and forth.- High Frequency = sounds are a higher pitch (soprano)
- Low Frequency = sounds are a lower pitch (bass)
Amplitude- represents the magnitude of their vibrations.- High Amplitude = sounds are louder
- Low Amplitude = sounds are quieter
Example the waveforms below, specifically lets take a look at Middle C
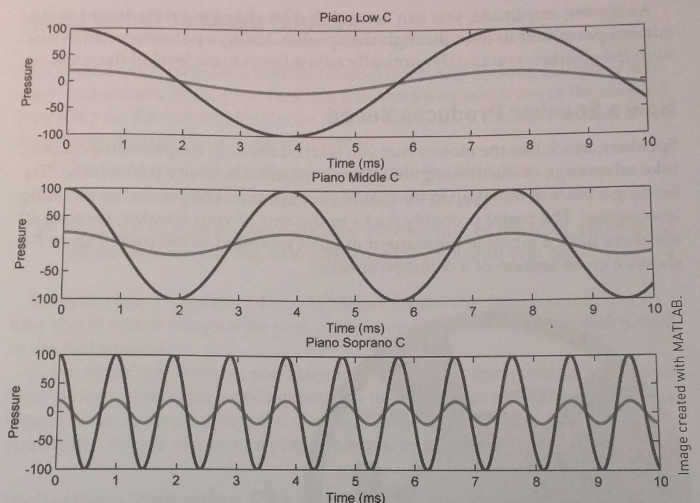
Middle C has a frequency of 261.63 Hertz (Hz). In other words, a speaker, a guitar string, or a piano string would complete 261.63 oscillations per second. We find the period of that by taking 1 / 261.62 which equals 3.822 milliseconds, which is the width of one complete oscillation in the graph. We can use that value and set it as the period for a square wave and thus adjust the tone of a note.
NOTE: Since the Arduino cannot create a true sinusoidal wave that you’d normally hear in the real world, we have to work with a plain square wave. The square wave oscillates between HIGH and LOW while switching instantly, instead of slowly like a sine wave. This results in a pressure wave that doesn’t fade off over time, leaving you with just a solid tone.
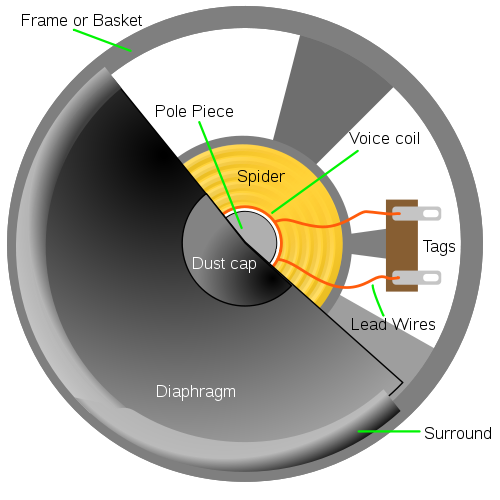
Looking at the speaker above, we can step through the process used to make a tone through a speaker.
-
There’s a permanent magnet mounted behind the voice coil and pole piece
-
We send a sinusoidal voltage signal (or a square wave in the case of the Arduino) into the leads of the coil
-
The changing current induces a magnetic field that causes the voice coil and diaphragm to vibrate up and down as the permanent magnet is attracted to and then repulsed by the magnetic field that was generated.
-
This back-and-forth vibration, in turn, vibrates the air in front of the speaker, effectively creating a sound wave that can travel to your eardrum.
Using the tone() function
Arduino IDE includes a built-in function for easily making sounds with arbitrary frequencies. The tone() function generates a square wave of the selected frequency on the output pin of your choice. The tone() function accepts three arguments:
-
pin- the pin on which to generate the tone -
frequency- the frequency of the tone in hertz (unsigned int) -
duration- the duration of the tone in milliseconds (optional); If this argument is not set, the tone continues playing until you callnoTone().
Lets have a look at some code from the Arduino community reference page.
To start with we hook up positive line from our speaker to Digital Pin 8 on the Arduino. Lets add this line to our code defining the pin 8 constant:
// Pin for tone output
const int tonePin = 8;
Next we’ll create a little melody for our Arduino to play. We can do this using an array called melody with our notes listed in each subsequent slot.
// Melody of notes
int melody[] = {NOTE_C4, NOTE_G3, NOTE_G3, NOTE_A3, NOTE_G3, 0, NOTE_B3, NOTE_C4};
You’ll now notice that the notes we’ve referenced in the array don’t exist anywhere. Each of those note variables need to reference an integer value defining their pitch. You could go through and work these out yourself, but that would be silly; especially because there’s already a great list provided on the Tone Tutorial page.
Go ahead and press Ctrl+Shift+N or select the arrow in the right hand corner of the Arduino IDE and click New Tab. Name the new file pitches.h and paste the following code into the IDE:
#define NOTE_B0  31
#define NOTE_C1  33
#define NOTE_CS1 35
#define NOTE_D1  37
#define NOTE_DS1 39
#define NOTE_E1  41
#define NOTE_F1  44
#define NOTE_FS1 46
#define NOTE_G1  49
#define NOTE_GS1 52
#define NOTE_A1  55
#define NOTE_AS1 58
#define NOTE_B1  62
#define NOTE_C2  65
#define NOTE_CS2 69
#define NOTE_D2  73
#define NOTE_DS2 78
#define NOTE_E2  82
#define NOTE_F2  87
#define NOTE_FS2 93
#define NOTE_G2  98
#define NOTE_GS2 104
#define NOTE_A2  110
#define NOTE_AS2 117
#define NOTE_B2  123
#define NOTE_C3  131
#define NOTE_CS3 139
#define NOTE_D3  147
#define NOTE_DS3 156
#define NOTE_E3  165
#define NOTE_F3  175
#define NOTE_FS3 185
#define NOTE_G3  196
#define NOTE_GS3 208
#define NOTE_A3  220
#define NOTE_AS3 233
#define NOTE_B3  247
#define NOTE_C4  262
#define NOTE_CS4 277
#define NOTE_D4  294
#define NOTE_DS4 311
#define NOTE_E4  330
#define NOTE_F4  349
#define NOTE_FS4 370
#define NOTE_G4  392
#define NOTE_GS4 415
#define NOTE_A4  440
#define NOTE_AS4 466
#define NOTE_B4  494
#define NOTE_C5  523
#define NOTE_CS5 554
#define NOTE_D5  587
#define NOTE_DS5 622
#define NOTE_E5  659
#define NOTE_F5  698
#define NOTE_FS5 740
#define NOTE_G5  784
#define NOTE_GS5 831
#define NOTE_A5  880
#define NOTE_AS5 932
#define NOTE_B5  988
#define NOTE_C6  1047
#define NOTE_CS6 1109
#define NOTE_D6  1175
#define NOTE_DS6 1245
#define NOTE_E6  1319
#define NOTE_F6  1397
#define NOTE_FS6 1480
#define NOTE_G6  1568
#define NOTE_GS6 1661
#define NOTE_A6  1760
#define NOTE_AS6 1865
#define NOTE_B6  1976
#define NOTE_C7  2093
#define NOTE_CS7 2217
#define NOTE_D7  2349
#define NOTE_DS7 2489
#define NOTE_E7  2637
#define NOTE_F7  2794
#define NOTE_FS7 2960
#define NOTE_G7  3136
#define NOTE_GS7 3322
#define NOTE_A7  3520
#define NOTE_AS7 3729
#define NOTE_B7  3951
#define NOTE_C8  4186
#define NOTE_CS8 4435
#define NOTE_D8  4699
#define NOTE_DS8 4978
Save that file and navigate back to your tone project we were working on before.
Next we’ll define the tones duration, and again we’ll use a matching array of integers
// note durations: 4 = quarter note, 8 = eighth note, etc.:
int noteDurations[] = {4, 8, 8, 4, 4, 4, 4, 4};
Now that we have a tune setup and defined we can move into the setup() block and begin writing the code that will play our tones.
void setup() {
  // iterate over the notes of the melody:
  for (int thisNote = 0; thisNote < 8; thisNote++) {

    // to calculate the note duration, take one second
    // divided by the note type.
    //e.g. quarter note = 1000 / 4, eighth note = 1000/8, etc.
    int noteDuration = 1000 / noteDurations[thisNote];
    tone(tonePin, melody[thisNote], noteDuration);

    // to distinguish the notes, set a minimum time between them.
    // the note's duration + 30% seems to work well:
    int pauseBetweenNotes = noteDuration * 1.30;
    delay(pauseBetweenNotes);
    // stop the tone playing:
    noTone(tonePin);
  }
}

void loop() {
  // no need to repeat the melody.
}
Run your code and enjoy the jams! Note that since we haven’t setup this code to loop; you’ll need to either reboot your Arduino or press the reset button on the board to get the tone to replay. You could even move the code block in setup() down into loop() to get it to continuously play the tones.
Conclusion
I wish I had more to say on this topic, It turned out to be a lot easier than I expected. I hope to expand on some ideas with the speaker in some later projects; but for now it was great to just learn the fundamental details about how a speaker actually works. I hope it was helpful for you as well :)
Thanks to resources taken from Jeremy Blum’s - Exploring Arduino and may great tutorials on the arduino.cc webpage.